Raspberry Occupancy monitoring
IMAGE DOWNLOAD
(always latest version, current version is v5.4)
Raspberry i Model 4B – >=8GB sdcard (image is ~5 gb)
Download the packageLOGIN DETAILS
username: pi
password: dashboard
WRITE IMAGE TO SD-CARD
Please use the official image tool to write the image onto the sd card
https://www.raspberrypi.org/downloads/
- Choose OS
- Scroll down to ‘use custom’ and select your downloaded image
- Choose SD card
- Write
Sd card should now be ready.
TESTING GPIO
If your command does not work, please read : http://wiringpi.com/wiringpi-updated-to-2-52-for-the-raspberry-pi-4b/
If you want to test the pins on the Pi the easiest way is to use the gpio command.
Run: gpio readall
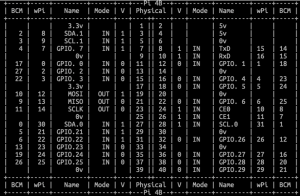
So see current Pins and their status. SIGMA Pi is using the follwing pins as default:
BCM: 10 – ok status
BCM: 11 – alarm status
BCM: 9 – warning status
To enable BCM 10 simply type: gpio toggle 12
The reason for 12 is that this is the wPi pin. One can also write gpio -g toggle 10 as -g points to the BCM number. You will now see a 1 in the V column of BCM 10 to indicate it’s turned on.
RELAY HAT (DOOR CONTROL)
As the pins only produce 3v there needs to be something stronger to control a 12v or 220/240v device. There are various relay “hats” to control doors, we have tested the Waveshare RPi Relay Board with great success.
This hat works out of the box on our image, and all you need to do is to reassign the pins of the kiosk settings. Simply edit the [PINS] section of /home/pi/screen/kiosk.ini: sudo nano screen/kiosk.ini
If your relay needs different pins simply change them in the screen/kiosk.ini file as needed. For waveshare use:
[PINS]
PIN1=26
PIN2=20
PIN3=21
inverted=1
To test your relay if it works without connecting everything to MQTT, simply set your pin mode to OUT
gpio -g mode 26 out
and then toggle it
gpio -g toggle 26
https://www.waveshare.com/wiki/RPi_Relay_Board
WIDGET URL
Use your BEA Analytics (https://login.meetsigma.io) to configure your widget.
Sound issues
If you are having sound issues, make sure the micro HDMI is connected to the first port (closest to the usb power), sound will not work on both outputs, making it work on HDMI port 2 requires a command on the pi.
If you cannot see what port is used (eg. remote location) then run the following command
tvservice -l
which outputs
1 attached device(s), display ID’s are :
Display Number 7, type HDMI 1
HDMI 1 = port closest to analog audio
HDMI 0 = closest to usb power
CHANGELOG
v5.4
– bugfix when locale is not set
– added invert flag for pi’s with relays (add “inverted=1” to [PINS] section in /home/pi/screen/kiosk.ini)
– added relay test command
– default password properly set to ‘dashboard’ this time
See all our segments
-
-
Doors & Windows
-
Guidance & Access Control
-
-
-
Doors
-
Gates & Barriers
-
-
-
Autonomous Robots
-
Traffic & Transport Solutions
-
Asset Protection
-